Install Seatext on your website by following the instructions below. The installation process is secure, and the AI remains inert until activated, ensuring the integrity of your website's content.
Before you can install the script, you need a SEATEXT AI account. If you don't have an account yet, you can create one HERE
Before you can install the script, you need a SEATEXT AI account. If you don't have an account yet, you can create one HERE
WP Engine Integration
Below is a step-by-step guide to integrate SEATEXT AI into your WP Engine website using a ZIP file. You can also follow the general integration instructions for SEATEXT AI provided here
1 . Please download the SEATEXT AI ZIP plugin using this link. Be sure to save this file on your computer where you can easily find it later.
2 . Log in to your website’s wp-admin dashboard
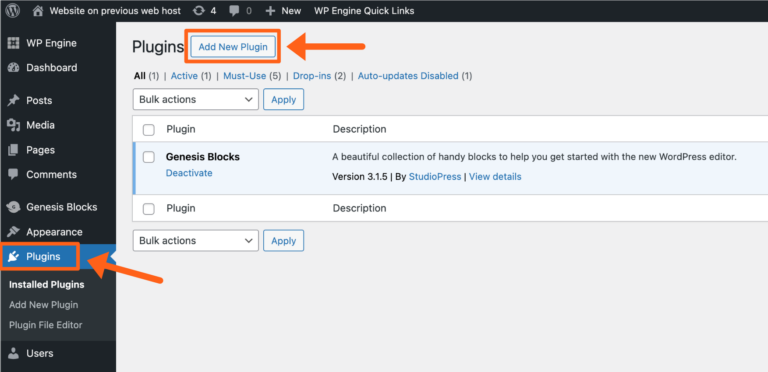
3 . Click Add New Plugin at the top of the page (/wp-admin/plugin-install.php)
2 . Log in to your website’s wp-admin dashboard
3 . Click Add New Plugin at the top of the page (/wp-admin/plugin-install.php)

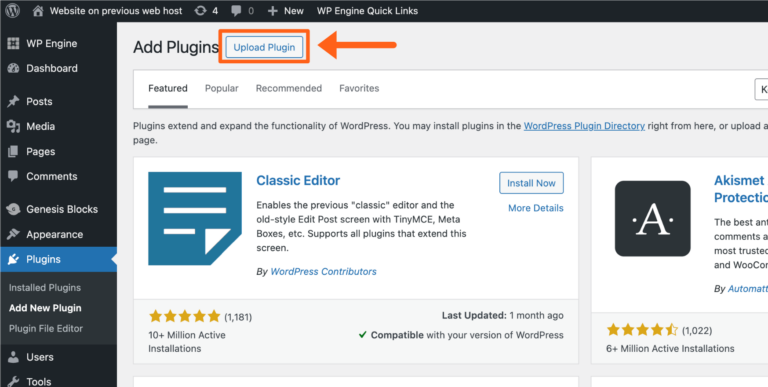
4 . Click Upload Plugin at the top of the page

5 . Locate and select the seatext.zip plugin
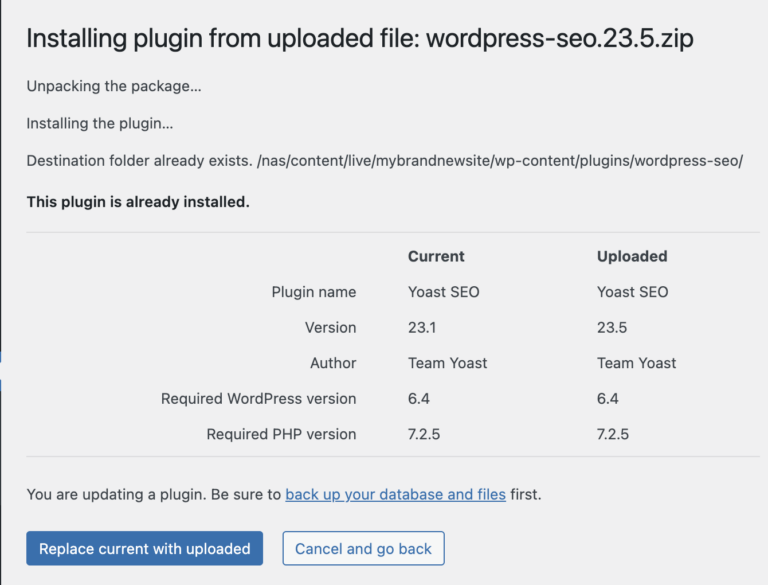
6 . Click Install Now
6 . Click Install Now

seatextdontseatext.zip
7 . Click Activate Plugin
That’s it! Your plugin is now installed, active, and ready to use on your website.
That’s it! Your plugin is now installed, active, and ready to use on your website.
If you are using Web Performance Optimization (WPO) tools like WP Rocket or LiteSpeed Cache, you must exclude Seatext from the minifying. Also clear cache.
8 . Once installed and activated properly, go to the “SEATEXT” Tab

9 . Click on “Register at Seatext.com”

10 . Create or Login in your Seatext account

Multiple Domains
If you need to use SEATEXT AI on multiple domains (e.g., a development domain and a production domain), you must create separate accounts for each domain.
Each SEATEXT AI account is linked to a single primary URL.
Restrictions and Security
Development URLs, such as localhost, are restricted for security reasons. Ensure you use a valid, real domain for these cases.
Dynamic development domains may not function properly, as SEATEXT AI might be unable to reliably associate traffic with your account.
Using SEATEXT AI on Multiple Websites
To use SEATEXT AI on several websites, create one account for each website.
Important: Visit or refresh your website several times and stay on your page for at least 40 seconds—this will activate the AI and link it to your account.
Important: Wait at least five minutes until you see your website name displayed next to the SEATEXT logo at the top of this page. This indicates that your website is connected and ready to proceed to the next step. If you do not see it at the top of the page after 10 minutes, please contact our support team immediately. This could indicate an issue during the installation on your platform, and you may need our assistance.
seatextonly